Using Hardhat
Hardhat is a popular development environment for EVM-compatible blockchains, consisting of multiple components for writing, compiling, debugging, and deploying smart contracts.
In this tutorial, you'll learn how to compile, deploy, and call smart contracts on Core Testnet using Hardhat. We'll use the pre-configured Hardhat starter kit that includes all necessary dependencies and configurations for Core blockchain development.
Prerequisites
Before you begin, ensure you have:
- Node.js v18.0.0 or later installed
- Git installed on your system
- A Core Testnet wallet with some test tokens (get them from the Core Faucet)
Clone the Starter Kit
Clone the Hardhat starter kit repository:
git clone https://github.com/coredao-org/hardhat-tutorial.git
cd hardhat-tutorial
npm install
Project Structure
After cloning and installing dependencies, you'll find the following project structure in the starter kit:
hardhat-tutorial/
├── contracts/           # Solidity smart contracts
│   └── Storage.sol     # Example storage contract
├── scripts/            # Deployment and interaction scripts
│   └── deploy.js       # Example deployment script
├── test/               # Test files
│   └── Storage.test.js # Example test file
├── hardhat.config.js   # Hardhat configuration
├── package.json        # Dependencies and scripts
└── README.md          # Project documentation
The starter kit comes pre-configured with:
- contracts/: Contains example Solidity smart contracts
- scripts/: Contains deployment and interaction scripts
- test/: Contains test files using modern testing patterns
- hardhat.config.js: Pre-configured for Core blockchain networks
Understanding the Hardhat Configuration
The starter kit comes with a pre-configured hardhat.config.js file optimized for Core blockchain development. Let's examine the key components of this modern Hardhat v2 configuration:
/**
 * @type import('hardhat/config').HardhatUserConfig
 */

// Import the Hardhat Toolbox - includes all essential plugins
require("@nomicfoundation/hardhat-toolbox");

module.exports = {
  // Solidity compiler configuration
  solidity: {
    version: "0.8.24", // Recommended Solidity version for Core
    settings: {
      evmVersion: "shanghai", // Required for Core blockchain compatibility
      optimizer: {
        enabled: true,        // Enable optimizer for gas efficiency - Optional
        runs: 200,           // Optimize for 200 function calls
      },
    },
  },
  // Network configurations for different environments
  networks: {
    // Local development network
    hardhat: {},

    // Core Mainnet configuration
    core_mainnet: {
      url: "https://rpc.coredao.org/",
      accounts: process.env.PRIVATE_KEY ? [process.env.PRIVATE_KEY] : [],
      chainId: 1116,
    },

    // Core Testnet configuration
    core_testnet2: {
      url: "https://rpc.test2.btcs.network",
      accounts: process.env.PRIVATE_KEY ? [process.env.PRIVATE_KEY] : [],
      chainId: 1114,
    },
  },
  // Contract verification configuration
  etherscan: {
    apiKey: {
      core_testnet2: process.env.CORE_TEST2_SCAN_KEY,
      core_mainnet: process.env.CORE_MAIN_SCAN_KEY,
    },
    customChains: [
      {
        network: "core_testnet2",
        chainId: 1114,
        urls: {
          apiURL: "https://api.test2.btcs.network/api",
          browserURL: "https://scan.test2.btcs.network/",
        },
      },
      {
        network: "core_mainnet",
        chainId: 1116,
        urls: {
          apiURL: "https://openapi.coredao.org/api",
          browserURL: "https://scan.coredao.org/",
        },
      },
    ],
  },

  // Test configuration
  mocha: {
    timeout: 20000, // 20 second timeout for tests
  },
};
Environment Variables Setup
Create a .env file in your project root with the following variables:
# Your wallet private key (without 0x prefix)
PRIVATE_KEY=your_private_key_here

# Core Scan API keys for contract verification (optional)
CORE_TEST2_SCAN_KEY=your_testnet_scan_api_key
CORE_MAIN_SCAN_KEY=your_mainnet_scan_api_key
Important: Make sure your smart contract follows the Solidity Support Guidelines for Core blockchain. The evmVersion: "shanghai" setting in the configuration ensures Core blockchain compatibility.
Never hardcode private keys in your scripts. Always use environment variables and avoid committing .env files to version control (add .env to .gitignore)
Writing Smart Contracts
For the sake of simplicity, let's use the 1_Storage.sol file we're already familiar with from the Remix tutorial. Copy the code below into a new file called Storage.sol and save it to the contracts folder.
// SPDX-License-Identifier: GPL-3.0

pragma solidity ^0.8.24;

/**
 * @title Storage
 * @dev Store & retrieve value in a variable
 */
contract Storage {

    uint256 number;

    /**
     * @dev Store value in variable
     * @param num value to store
     */
    function store(uint256 num) public {
        number = num;
    }

    /**
     * @dev Return value
     * @return value of 'number'
     */
    function retrieve() public view returns (uint256){
        return number;
    }
}
Contract Compilation
Run the following command to compile the contract:
npx hardhat compile
Contract Testing
Create a new file called storage-test.js containing the following code, and save it to the test folder:
const { expect } = require("chai");
const { ethers } = require("hardhat");

describe("Storage", function () {
  let storage;

  beforeEach(async function () {
    Storage = await ethers.getContractFactory("Storage");
    [operator] = await ethers.getSigners();

    storage = await Storage.connect(operator).deploy();

    await storage.waitForDeployment();
    expect(await storage.retrieve()).to.equal(0n);
  });

  describe("Test store function", function () {

    it("should work properly", async function () {
      let tx = await storage.store(100);
      await tx.wait();
      expect(await storage.retrieve()).to.equal(100n);
    });

    it("should throw", async function () {
      await expect(storage.store(-1)).to.be.throws;
    });

  });
});
To test our Storage.sol contract on the built-in Hardhat network, run the following command:
npx hardhat test --network hardhat
$ npx hardhat test --network hardhat


  Storage
    Test store function
      ✔ should work properly
      ✔ should throw


  2 passing (1s)
Contract Deployment and Interaction
Hardhat makes it easy to use the ethers.js library to deploy and interact with our smart contracts. Create a new file called deploy-and-call.js in the scripts folder that contains the following code:
// We require the Hardhat Runtime Environment explicitly here. This is optional
// but useful for running the script in a standalone fashion through `node <script>`.
//
// You can also run a script with `npx hardhat run <script>`. If you do that, Hardhat
// will compile your contracts, add the Hardhat Runtime Environment's members to the
// global scope, and execute the script.
const hre = require("hardhat");

async function main() {
  const Storage = await hre.ethers.getContractFactory("Storage");
  const storage = await Storage.deploy();

  await storage.waitForDeployment();
  console.log("Storage contract deployed to:", storage.target);

  console.log("call retrieve():", await storage.retrieve());

  console.log("call store(), set value to 100");
  const tx = await storage.store(100);
  await tx.wait();

  console.log("call retrieve() again:", await storage.retrieve());
}

// We recommend this pattern to be able to use async/await everywhere
// and properly handle errors.
main().catch((error) => {
  console.error(error);
  process.exitCode = 1;
});
This script does a few things:
- Deploys our smart contract;
- Prints the deployed contract's address;
- Calls the retrieve function to check the stored number;
- Calls the store function to store a new number;
- Calls the retrieve function to check the stored number again;
Let's run the script by executing the following command:
npx hardhat run scripts/deploy-and-call.js --network core_testnet2
$ npx hardhat run scripts/deploy-and-call.js --network core_testnet2
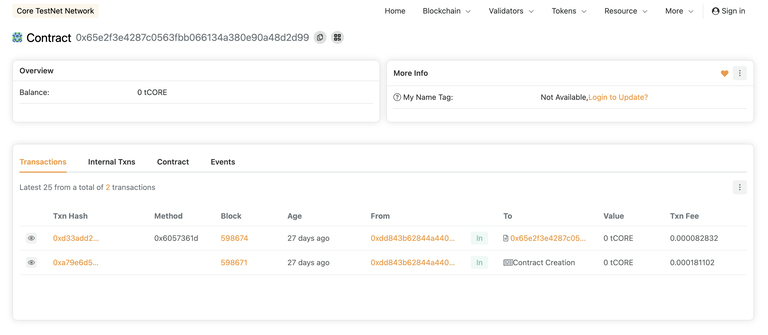
Storage contract deployed to: 0x65e2F3E4287C0563fBB066134A380e90a48d2D99
call retrieve(): 0n
call store(), set value to 100
call retrieve() again: 100n
We can see that the script correctly deployed the contract, stored a number, and confirmed that the number is now stored in the contract.
We can use Core Scan to search for the contract's address to verify that the contract was successfully deployed and called.
Further Reading
For detailed instructions on using Hardhat and plugins such as ethers.js, please visit Hardhat's official website.