ERC-20 Tokens
What is ERC-20?
ERC-20 is a standard for fungible tokens on the Ethereum blockchain. Unlike ERC-721 tokens, which are non-fungible and unique, ERC-20 tokens are fungible and interchangeable, allowing them to be traded or exchanged in equal quantities. They are the most common token type for projects involving cryptocurrencies, digital assets, and decentralized applications (dApps).
Prerequisites
Before starting, you’ll need:
- MetaMask or any EVM wallet.
- A basic understanding of Solidity (though we will guide you through the whole process).
- Access to Remix IDE: https://remix.ethereum.org
Step 1: Use OpenZeppelin Wizard to Generate Your ERC-20 Contract
Why Use OpenZeppelin Wizard?
OpenZeppelin provides secure, audited smart contract templates. The OpenZeppelin Wizard is an excellent tool that streamlines the process of creating ERC-20 tokens, ensuring your contract adheres to best practices.
-
Go to OpenZeppelin's Wizard: Open the OpenZeppelin Wizard in your browser.
-
Select ERC-20: In the list of available contract templates, select ERC-20.
-
Customize Your Contract:
- Token Name: Enter the name of your token (e.g.,
MyToken). - Token Symbol: Enter the symbol for your token (e.g.,
MTK). - Initial Supply: Set an initial supply for your token (e.g.,
1000000tokens). This is the number of tokens that will be created upon deployment.
- Token Name: Enter the name of your token (e.g.,
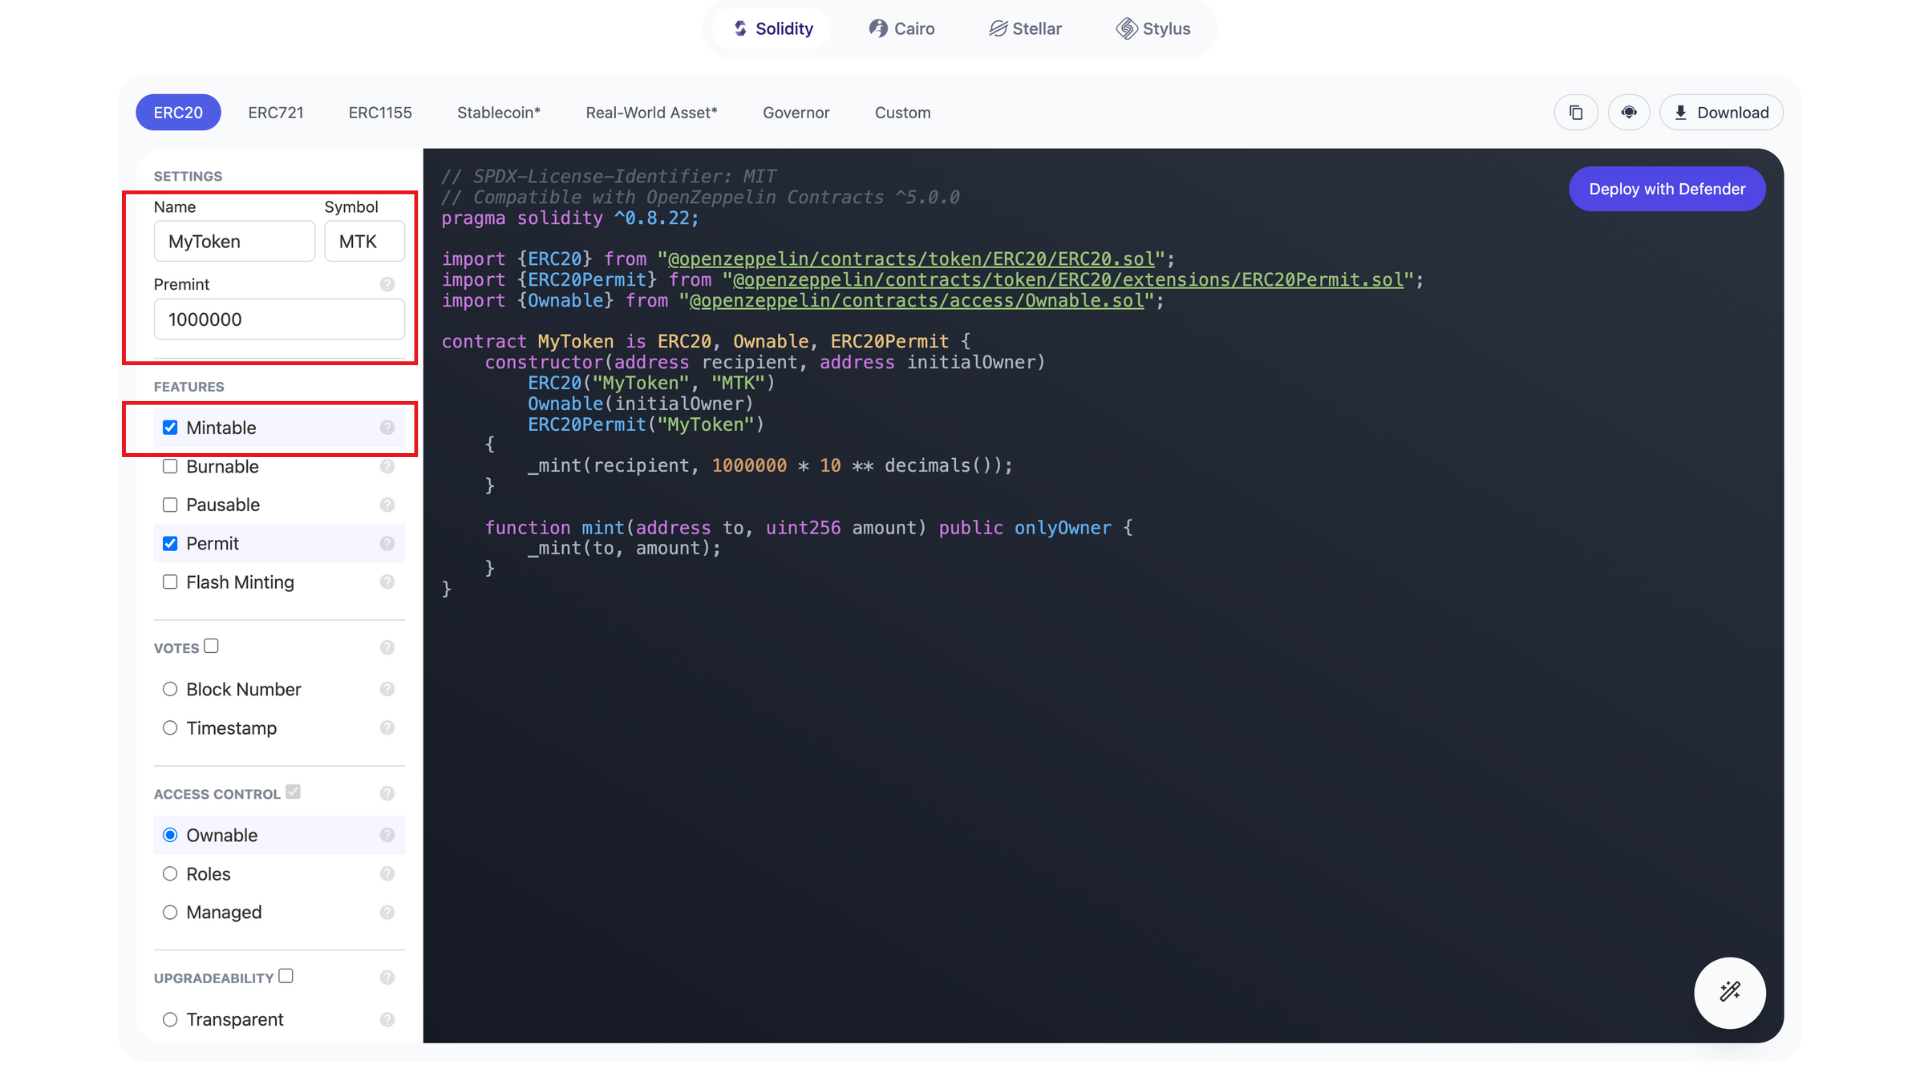
Optionally, you can include additional features, such as minting and pausing, if needed for your use case.
- Copy the Code: Once you've configured your contract, click the Copy button to get the Solidity code. You can either copy it to your clipboard or directly open it in Remix IDE.
Step 2: Set Up Remix IDE
Remix IDE is an online platform for Solidity development, making it perfect for beginners and quick testing.
-
Go to Remix IDE: Open Remix IDE in your browser.
-
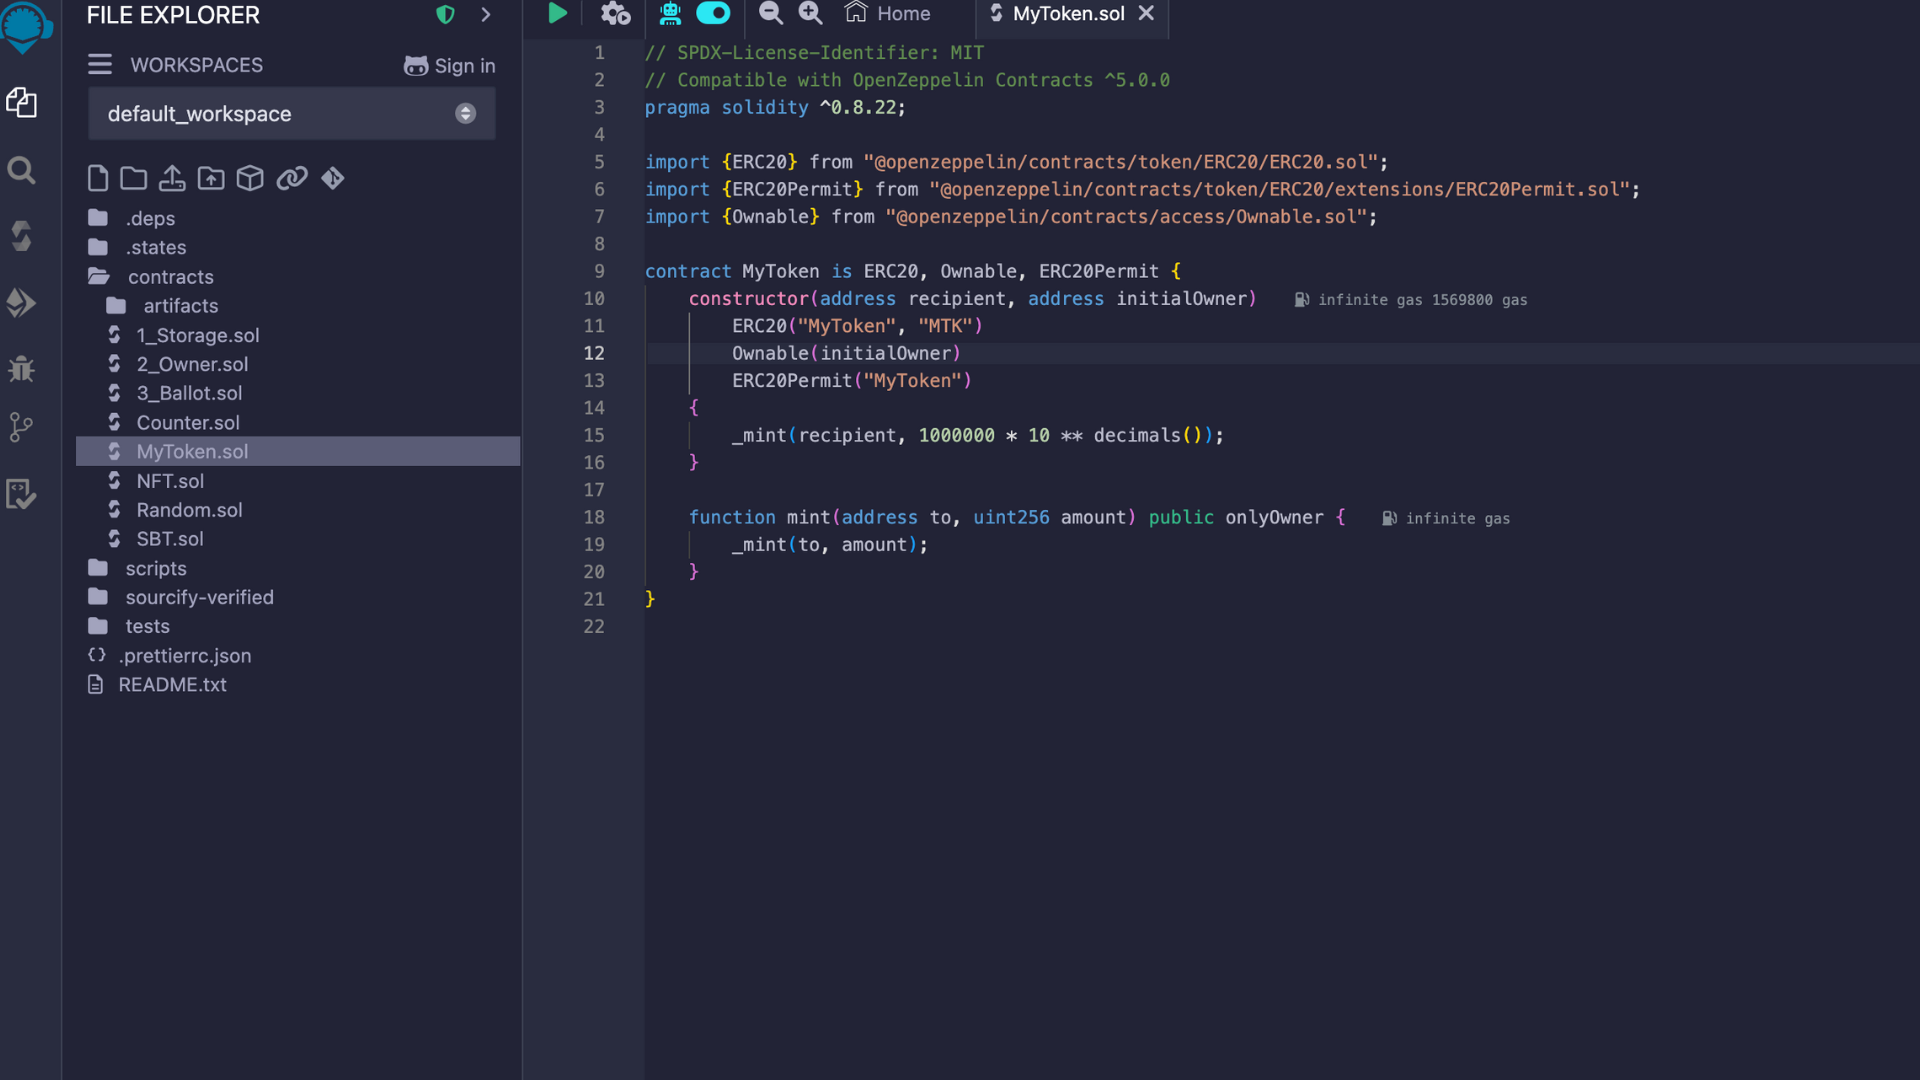
Create a New Solidity File:
- In Remix, create a new file by navigating to the contracts directory and clicking the + button.
- Paste the ERC-20 contract code you copied from OpenZeppelin’s Wizard into the newly created file.
- Install OpenZeppelin Contracts:
- If you're using Remix’s built-in Solidity compiler, it will automatically fetch OpenZeppelin contracts for you.
- If you're using Hardhat, you'll need to manually install OpenZeppelin contracts by running
npm install @openzeppelin/contracts.
Step 3: Compile the Contract in Remix
- Compile Your Contract:
- In Remix IDE, go to the Solidity Compiler tab (the one with the Solidity logo).
- Select the compiler version that matches your contract (for example,
0.8.24). - Click Compile to compile your contract.
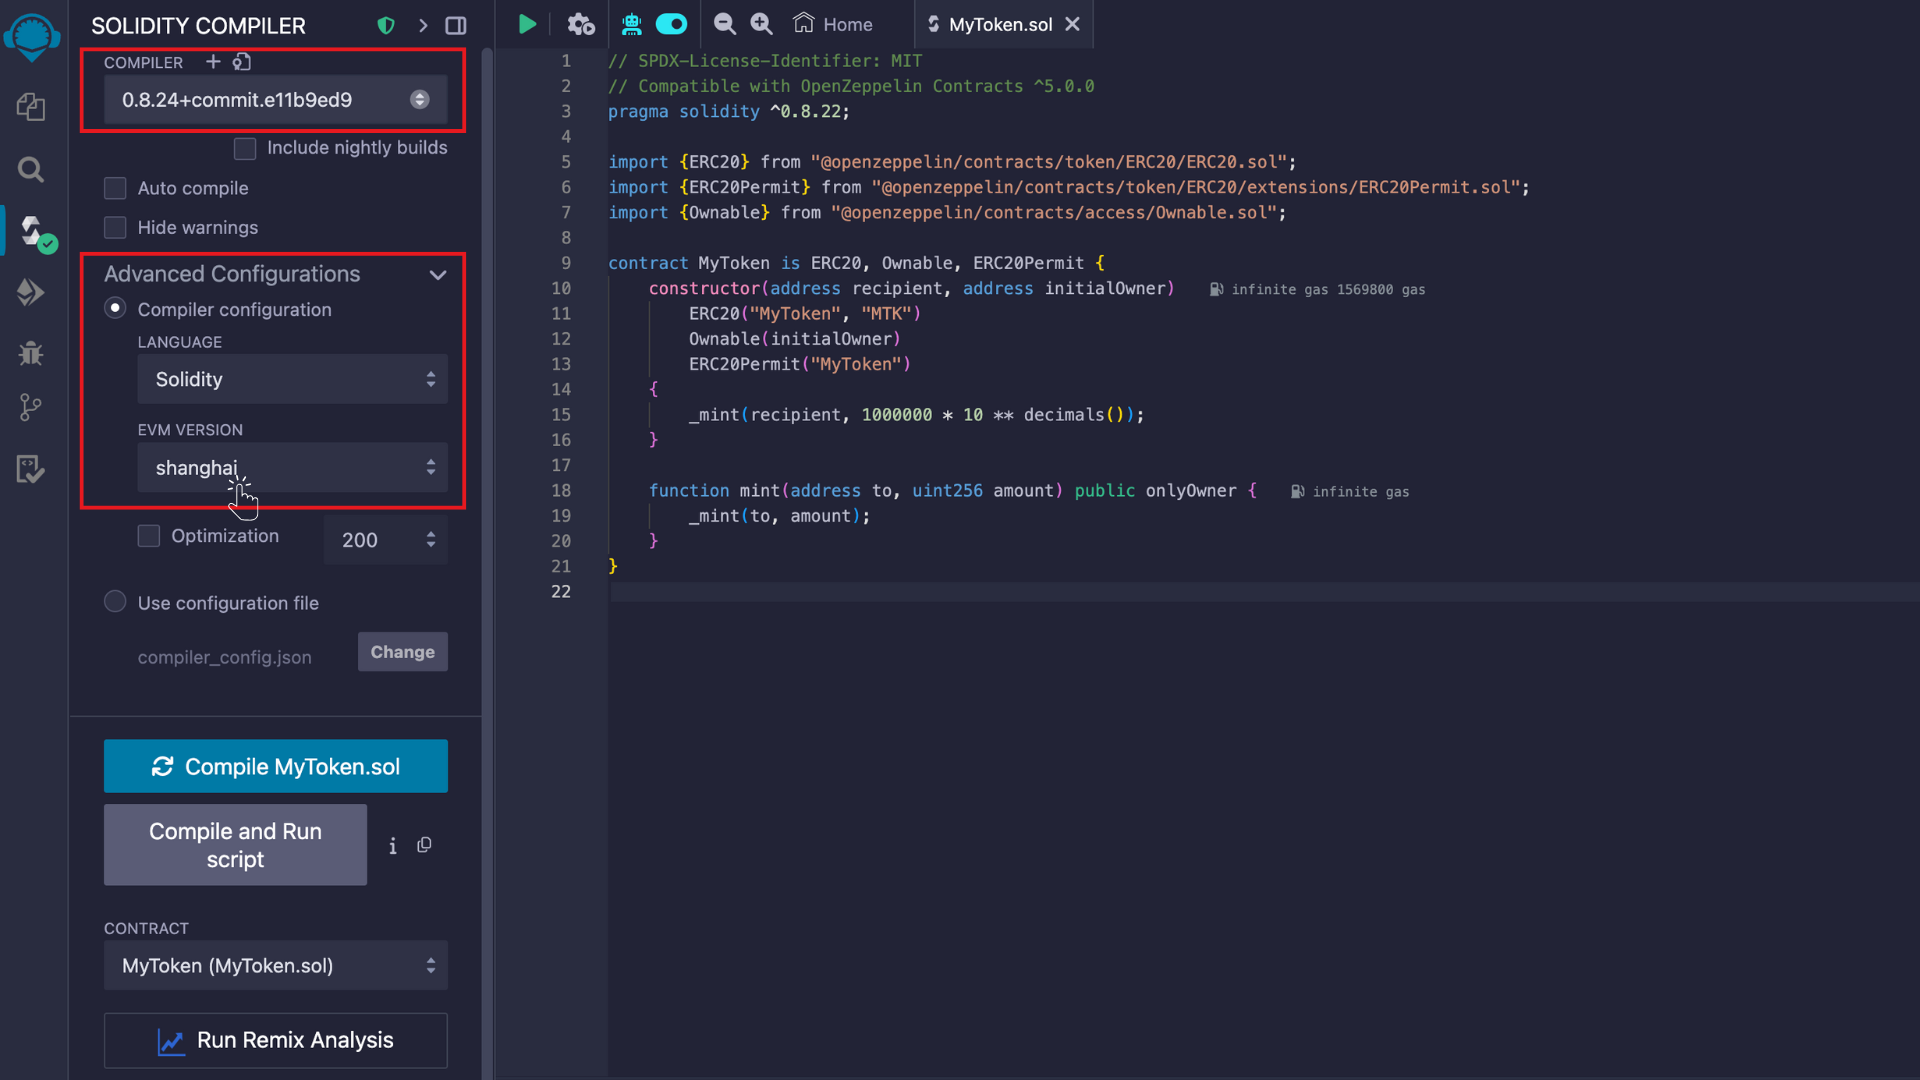
- Fix Any Errors: If there are any errors in the code, Remix will highlight them. Correct any issues and recompile.
Step 4: Deploy the Contract on a Test Network
-
Connect Remix to MetaMask:
- Go to the Deploy & Run Transactions tab in Remix.
- Under Environment, select Injected Web3. This will connect Remix to your MetaMask wallet.
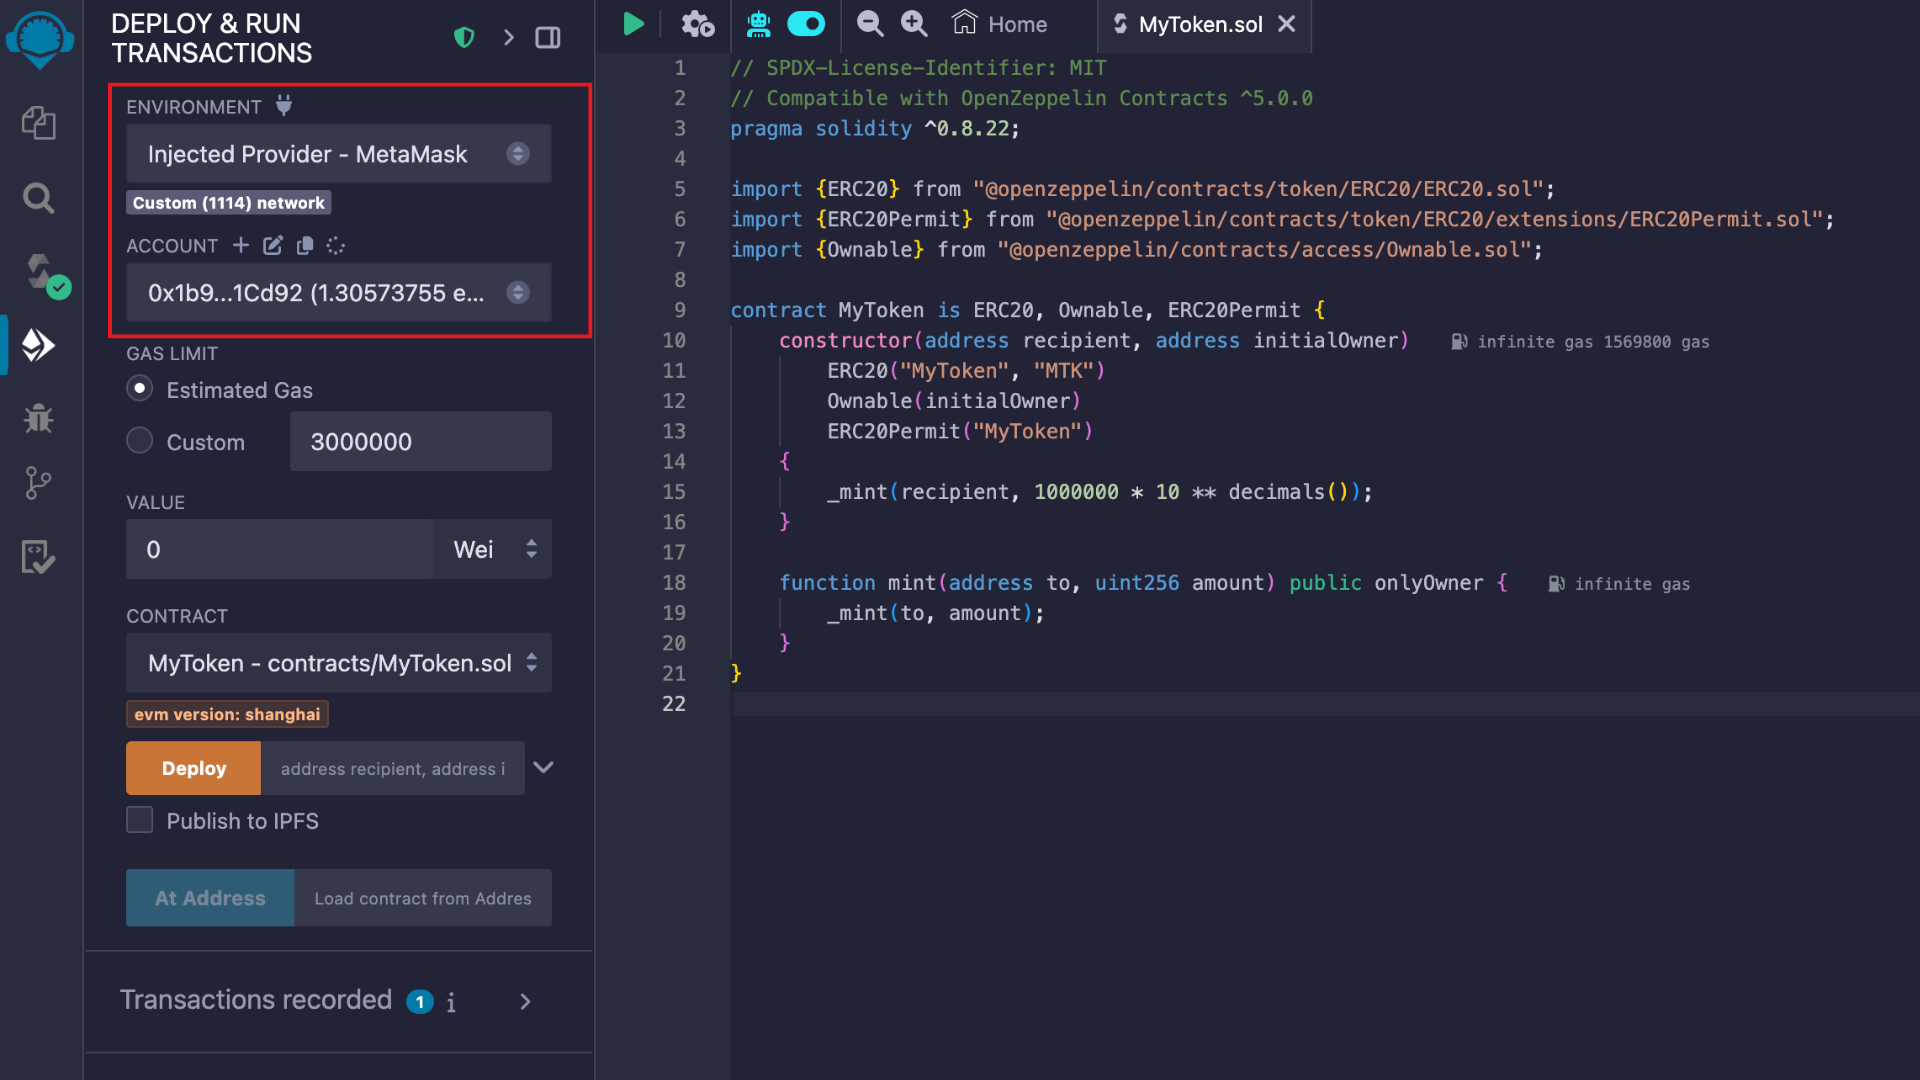
Ensure that your MetaMask is connected to the Core Testnet2.
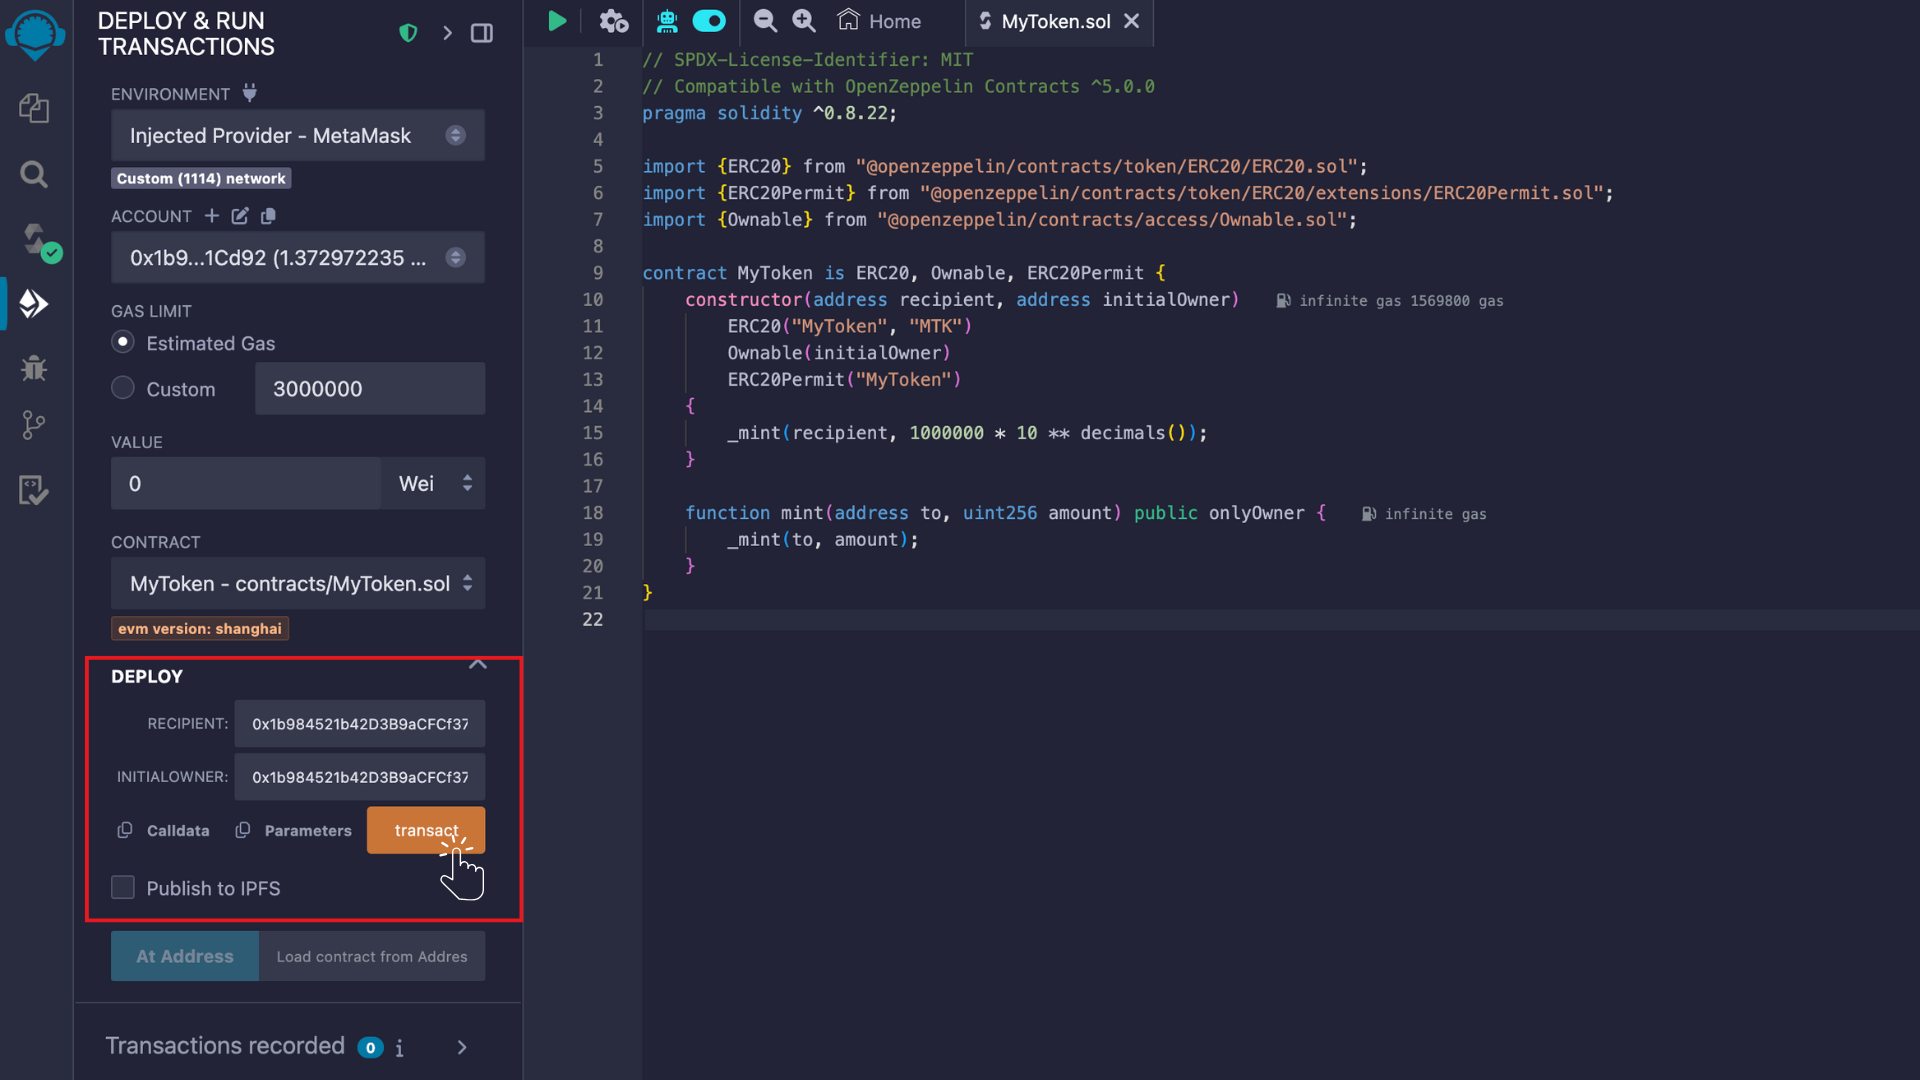
- Deploy Your Contract:
- In the Deploy section, select the ERC-20 contract (e.g.,
MyToken). - Please paste the
recipient addressfor the tokens to be minted in Premint, as well as theowner address(note that in this case, both addresses are the same). - Click on Deploy. You’ll be prompted to confirm the transaction in MetaMask.
- Once the contract is deployed, you’ll see the contract’s address in Remix.
- In the Deploy section, select the ERC-20 contract (e.g.,
Step 5: Interact with Your Contract
Now that your contract is deployed, you can interact with it directly from Remix.
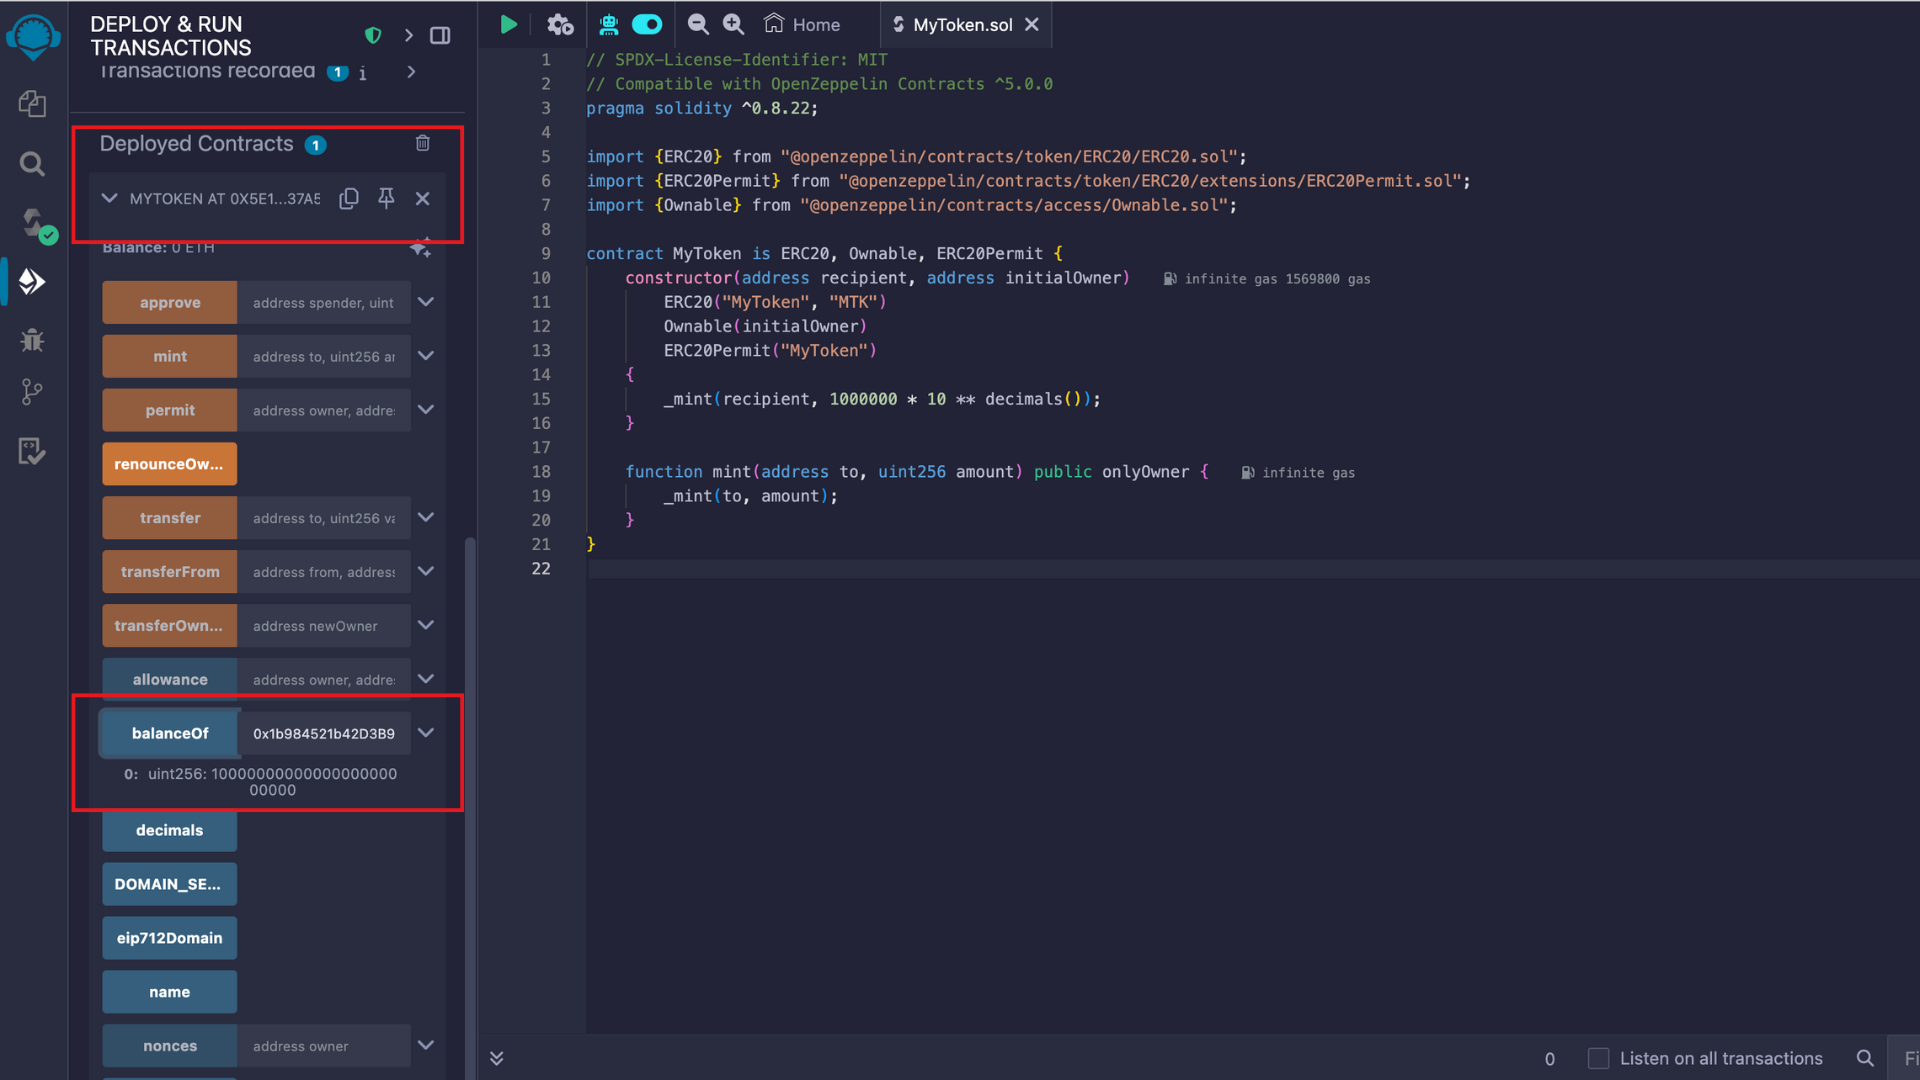
-
Check Balance:
- Under Deployed Contracts, you'll see your deployed contract.
- Expand the contract’s interface to interact with functions like
balanceOf,mint(if you included minting functionality). - Paste the recipient address and click on
balanceOfto check the recipient's balance.
-
Mint Tokens:
- Call the
mintfunction to create new tokens. Provide the recipient address and the number of tokens to mint. - Confirm the transaction in MetaMask.
- Call the
-
Transfer Tokens:
- You can also use the transfer function to send tokens from one address to another.
- Provide the recipient's address and the amount of tokens you want to send.
- Confirm the transaction in MetaMask.
Step 6: Manage Your Tokens
You can add additional functions to your contract, such as:
-
Burning Tokens: A function to burn (destroy) tokens.
-
Roles: Roles allow you to assign different permissions to addresses, such as minting or burning tokens, ensuring secure and controlled actions within the contract.
-
Upgradability: Enables you to upgrade the contract logic after deployment without losing data, ensuring flexibility for future improvements
You can find more information on OpenZeppelin ERC-20 implementation here.